
First, I started by collecting reference photos of her in-game 3-D model, her official illustrations and also the sample cosplay listing for sale by aforementioned Chinese companies (Uwowo and the like). I printed them out and put them into a blank journal that I decided was my costume/clothing planner, a helpful tip recommended by other costumers. I liked this idea because I could theoretically bring the journal with me to craft stores to match materials without having to waste mobile data on my phone pulling up the image, but the reality was I used my phone while shopping anyway lol. The journal was mostly there to organize my thoughts, create sketches of how to build the items, and make checklists to check off. I don’t like to sketch costume ideas on the computer, I feel more productive sketching on paper. My challenge: to DIY this costume only out of things I had at home, stuff from the thrift store or pre-owned, or stuff at the dollar store (Daiso in this case), and to minimize buying stuff at the craft store or brand new and full price. The costume listing online ranged from $150 to $200 (including wig and shoes and not counting shipping/taxes/fees), I was pretty sure I could beat that. Let’s see how I did!
Using the cosplay listing as a base, I separated out all the components of her costume into layers that are feasible to put on my body; the tunic, the shorts, the jacket with sleeves, the gloves, socks and shoes, the hair spikes and rings and thigh wrap, the drum and guitar. I’m not a hairstylist so I didn’t want to make the wig, but I was lucky to find a pre-owned Xinyan wig on Ebay that had the saddest looking wimpy hair puffs (probably why the seller never wore it lol). I collected the fabrics I already had at home (the white, yellow, black and red fabrics, the gold and white pleather), then went to the thrift stores to hunt for anything else I could use. I found the perfect brown shirt-dress for the tunic and a pair of sandals to use as the boots base. I ordered the Pyro vision from Ali Express because I wanted it to light up and match with the Cryo vision from my Kaeya costume, so that was my full price splurge. Then I went to Daiso to collect yarn to make the braids, and got to work.
This costume took me almost 2 years to make, since I made a lot of it in 2021/early 2022, then changed my mind and worked on other costumes the next year, then decided to go back and finish it for a convention in a rush this year. I didn’t document the making since literally no one else will cosplay Xinyan so who cares about this info, but for memories sake, I will highlight some interesting moments!
- Tunic: I drafted a paper pattern for the neckline then cut the shirt-dress to resemble her tunic shape. Since the front was a button-down design, I just flipped the back to become the front. I cut out black fabric to make the diagonal section on top, then made straps out of scrap ribbon. I had no idea what the little bars connecting the black/brown sections were made of so I just cut them out of pleather and painted them light silver and sewed them on. The part that took the longest was the black netting on the bottom, I didn’t know how to make it, do I weave netting out of yarn? Finally, after like a year of pondering, I just sewed black sheer ribbons on in a netting design. This was where I had to buy more ribbon from Michaels (first new purchase) to finish the netting on the back of the dress, I didn’t want to skimp and make it look half-done.
- Shorts: I used a commercial shorts pattern then drafted the sawtooth design on newspaper fit on the shorts. My pro tip: make a facing layer and flip it to the inside after sewing and trimming the seams to make sharp neat points. The longest step here was embroidering the black lines with embroidery floss. I mapped out straight lines using washi tape and sewed long back stitches, and this turned out perfectly.
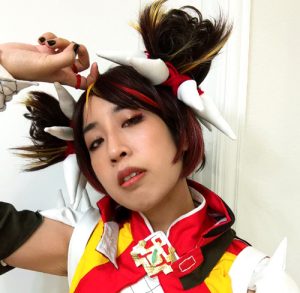
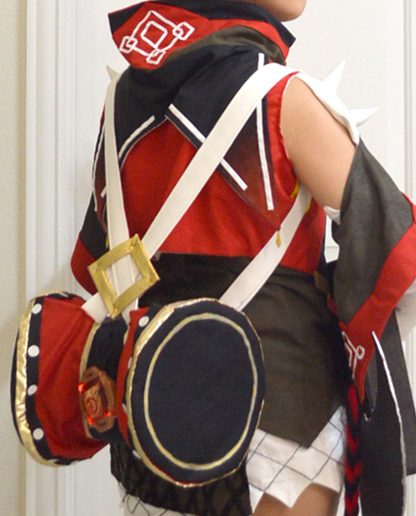
- Jacket + Sleeves: while challenging, I had a lot of fun figuring this out. The most difficult part was getting the jacket to lie on my body just right, since it had to cover the tunic at the correct length. I started with a commercial bolero pattern then used newspaper to draft the perfect shape and length. This bolero costume pattern also had a sailor collar that I adjusted, while the high mandarin collar I got from a different pattern, I think a combination of commercial and Otome no Sewing and online ones. The sailor collar was ombre (the curse of Genshin cosplays) and I debated dying it, but then had the brilliant idea to just paint the ombre with red acrylic paint and it worked! Then I had to work out the layers for the different color fabrics to sew down. The high collar was interfaced, the white stripes were made from bias binding folded in half and thin grosgrain ribbon (second new purchase from Michaels), the gold decoration was traced from her model on the computer screen and cut out of gold pleather. The green bead I thought about making but I found a similar jade green bead from my My Melody earrings and just used that instead. Her shoulder spike armor was sewn out of white pleather and stuffed with stuffing from an old pillow, inspired by the construction of the Kaeya shoulder spikes, that way I didn’t have to mess with a hard substance like Worbla. The sleeves were self-drafted and sewn with some difficulty, and I braided the tassels from yarn from Daiso (another new purchase). I tried a few different beads for her jacket decorations, even bought new glass beads to try, but in the end just made the decorations from funfoam and some jewelry parts.
- Gloves: I made the fingerless gloves from a long-sleeved white tshirt I was planning to donate but it looked kinda stained and so I had to hold on to. Yay for giving old clothes a new life! I used the same trick on the shorts to make the jagged edge and also embroidered it with black thread. I ended up pinning the gloves to the jacket to keep them up since they kept sliding down my arms.
- Socks: I fortunately already had a black fishnet sock bought years ago for a goth witch costume, so I cut a hole in the toe area to go over my foot and then folded the lace top down and added elastic. The white sock was made from the bottom hem of the same white t-shirt as the gloves, but I do need a better way to keep it up as it keeps falling down.
- Hair spikes: I made the spikes out of leather and stuffing and glued them to a black fun foam strip along with some red and black yarn for decoration. I pinned each spike around the removable pigtails, which I fluffed up with some matching brown hair bun ties from Daiso (yet another new purchase).
- Rings and thigh wrap: I first made 2 rings from some red cord to kinda match the Asian aesthetic and melted the ends together over a flame. Then for some reason I made the other 2 rings from red yarn, because I was lazy? Ideally, I would have rings out of some other material like plastic, because my fingers got swollen and the cords left marks, but I wasn’t going to buy plastic rings, and didn’t know where to find such a thing either. The thigh wrap was braided yarn sewn to an elastic band. It sort of stayed up but sometimes when I was walking quickly it fell down.
- Shoes: this was the true challenge and why it took me so long, lol. Shoe-making was so difficult to do and I seriously considered just buying her shoes online. I wore black combat boots to the convention for comfort and it matched her vibe and worked great, but I still wanted to show off her punk rock pedicure with actual boot covers sewn over the thrifted heeled sandals. I tried so many online cosplay boots tutorials but none of them worked, not even fun foam, I felt like an incompetent fool. In the end, I went back to the trial ones I sewed out of old black pajama pants and added pleather spikes and some boning to try to keep the structure upright and bootlike. It didn’t work, they still fell down a lot, but at least I was able to get a few good photos out of them. I think my biggest problem is that I was trying to make fabric boot covers or spats to go over strappy sandals and there was just too little support for attaching without ruining the shoe underneath, and even making the spats out of funfoam or pleather would still have stability and attachment issues. The smartest move would be to buy heeled calf-high boots and cut out the toe areas, but I didn’t want to ruin knives cutting a boot apart.
- Drum: I made the drum structure out of shipping boxes and masking tape, then carefully made a fabric cover with scraps and interfacing and ribbon and bias tape decorations. The straps were made of white and gold pleather attached to stiff felt. I wanted there to be an opening at the top so I could use the drum as a backpack at the con, but the shape would have been better if I sewed the top closed and stuffed it with batting. The final part was the white symbol, cut out of white pleather, and the spikes. But I didn’t want spikes, even fabric ones, digging into my back, so I just sewed white circles to represent the spikes lol.
- Guitar: this was a last minute construction made the week before the con. I wasn’t going to bring it outside since it was large and bulky and fragile, but I needed something to pose with for home photos, and I didn’t have a claymore nor did I want to make one. I made the guitar out of shipping boxes hot glued into shape and covered with black electric tape. I made the white section with scrap tagboard from packaging, and other parts with more cardboard and glittery black washi tape, with paint and marker decorations. The guitar strings were just glittery embroidery floss. I’m super proud of this even though the bottom blade broke off (I had just taped it on), it took a bit of work but wasn’t difficult and made use of boxes destined for the recycling bin and looked awesome!
Cost of everything purchased new?
- Pyro vision: $20
- Wig: $10.83
- Yarn (red and black): $3
- Hair ties: $4
- Ribbon (black): $1.99
- Ribbon (white): $1.99
- Shirt dress: $5.99
- Sandals: $6.99 (not sure if they had a discount)
Total: $55 (not counting stuff I had at home or stuff I didn’t end up using), and even with the stuff at home, probably not even close to $200 total! Success!
When I wore the cosplay to A-kon, a ton of people told me I looked awesome, several recognized my character and one person told me they never saw a Xinyan cosplayer before (which is false, I saw one the previous year). Many people stopped to take my photo even though I was masked. Even though I went Saturday, the most crowded day, there weren’t that many Genshin cosplayers where I was walking for several hours compared to last year, although they could have been prepping for the contest or just somewhere else. I consider this costume a huge success and I’m glad it didn’t fall apart or was too uncomfortable or stuffy. I even brought Xinyan’s concert lightstick to a Japanese pop/rock concert that night! It was a perfect day spent in costume, and I am grateful to have gone with my friends.
Here are some more close up photos!